> For the complete documentation index, see [llms.txt](https://docs.microside.com/llms.txt). Markdown versions of documentation pages are available by appending `.md` to page URLs; this page is available as [Markdown](https://docs.microside.com/practicas/mplab-x-ide/xc8-compiler/pic18f4550-or-pic18f45k50/4-contador-binario.md).
# 4 - Contador Binario
> #### MPLAB X IDE - XC8 Compiler
>
> [**PIC18F4550 / PIC18F45K50**](https://docs.microside.com/practicas/mplab-x-ide/xc8-compiler/pic18f4550-or-pic18f45k50)
## **Introducción**
En esta práctica se configura entradas y salidas digitales del microcontrolador para implementar un contador binario que incrementa cada vez que se presiona un push button, el conteo se despliega a través de LEDs.
## **Descripción**
En esta práctica se implementa un contador binario usando la tarjeta **X-TRAINER** con el **PIC18F4550/PIC18F45K50**. El contador se incrementa cada vez que se presiona un botón conectado al pin A2, configurado como entrada digital. Para visualizar el valor del contador se utilizan 8 LEDs.
**Materiales:**
1 x Tarjeta **X-TRAINER**. [**Manuales**](https://docs.microside.com/tarjetas-de-desarrollo/x-trainer) | [**Comprar**](https://www.microside.com/shop/category/entrenadores-pic-1)
1 x Módulo programador **XCU** o **XCU Lite.** [**Manuales**](https://docs.microside.com/programadores-pics-and-avrs/pic-and-avr) **|** [**Comprar**](https://www.microside.com/shop/category/programadores-pics-avrs-15)
8 x Resistencias 220 ohms.
8 x LEDs.
1 x Protoboard de 830 puntos.
1 x Juego de cables Dupont.
1 x Cable micro USB.
**Software:**
Windows 7 o posterior.
MPLAB X IDE. [**Descarga**](https://www.microchip.com/mplab/mplab-x-ide)
Compilador XC8. [**Descarga**](https://www.microchip.com/en-us/development-tools-tools-and-software/mplab-xc-compilers)
X-TRAINER Suite v1.0 [**Descarga**](https://raw.githubusercontent.com/MICROSIDE-TECHNOLOGY/microside_download_archive/main/Tools/X-TRAINER%20Suite/X-TRAINER%20Suite%20Setup.zip)
MPLAB Code Configurator. (**Solo para PIC18F45K50**)
## **Procedimiento**
1. En el apartado de “[**Diagrama esquemático**](#diagrama-esquematico)” selecciona el modelo de tu tarjeta, realiza las conexiones que se muestran en la imagen y conéctala a la computadora.
{% hint style="info" %}
Las conexiones mostradas en los diagramas esquemáticos son las mismas ya sea que la tarjeta **X-TRAINER** posea el **PIC18F4550** o el **PIC18F45K50**.
{% endhint %}
2. Ejecuta **MPLAB X IDE** y crea un nuevo proyecto con el código fuente que se encuentra en el apartado "[**Código**](#codigo)".
3. Si cuentas con un **PIC18F45K50** ejecuta MCC (MPLAB Code Configurator) y configura los diferentes apartados como lo muestran las siguientes imágenes.
{% hint style="warning" %}
En caso de utilizar un **PIC18F4550** omite este paso.
{% endhint %}
* [**Project Resources**](https://files.gitbook.com/v0/b/gitbook-x-prod.appspot.com/o/spaces%2FbyV2zAlQAiqg46a3Lr8z%2Fuploads%2FuEZSVoGwHWRqfeqe6vQK%2FProject_Resources.webp?alt=media\&token=f85451f2-4649-43a6-ac00-5c9ccee992c6)
* [**System Module**](https://files.gitbook.com/v0/b/gitbook-x-prod.appspot.com/o/spaces%2FbyV2zAlQAiqg46a3Lr8z%2Fuploads%2FC6ojge7ryPi2OcAKxsYD%2FComun%20System%20module.webp?alt=media\&token=b82ed185-a2da-44f8-89a7-fb5245769117)
* [**Device Resources**](https://files.gitbook.com/v0/b/gitbook-x-prod.appspot.com/o/spaces%2FbyV2zAlQAiqg46a3Lr8z%2Fuploads%2F7gO2hUCwNSkYpIzQoPu2%2FComun%20Device%20Resource.webp?alt=media\&token=0eef8588-1608-4550-8b5a-f7c3c24bdde3)
* [**Pin Manager**](https://files.gitbook.com/v0/b/gitbook-x-prod.appspot.com/o/spaces%2FbyV2zAlQAiqg46a3Lr8z%2Fuploads%2Ff1VwYKVgbyQe7WEyDF4Q%2F4_PIN_MANAGER.webp?alt=media\&token=d0c6356f-eda3-4494-8b9c-cfaf39c67e38)
* [**Pin Module**](https://files.gitbook.com/v0/b/gitbook-x-prod.appspot.com/o/spaces%2FbyV2zAlQAiqg46a3Lr8z%2Fuploads%2FuQffhDjlpZxRwN3sokbm%2F4_PIN_MODULE.webp?alt=media\&token=df59ef68-2eac-4741-b64d-5b8a60b00e14)
{% hint style="success" %}
Si tienes dudas de cómo realizar los pasos anteriores puedes encontrar un manual de **MCC (MPLAB Code Configurator)** a través del siguiente [**link**](https://docs.microside.com/practicas/ides/mplab-code-configurator-mcc-mplab-x-ide).
{% endhint %}
4. Realiza los siguientes pasos para configurar el **bootloader** y poder programar la tarjeta **X-TRAINER**:
* Da clic en ***File*** y ***Project Properties***.
* Selecciona ***Building***, marca la casilla ***Insert unprotected checksum in user ID memory*** y da clic en ***Apply***.
* Selecciona ***XC8 Linker***, despliega el apartado ***Option categories***: y selecciona ***Memory model**.* \
En la sección de ***ROM ranges*** escribe **2000-7f00** y da clic en ***Apply***.
* Despliega nuevamente el apartado ***Option categories:*** y selecciona ***Additional options***. En la sección de ***Codeoffset*** escribe **2000**, da clic en ***Apply*** y por último da clic en ***OK***.
5. Una vez realizadas las configuraciones del bootloader compila el proyecto.
{% hint style="success" %}
Para compilar el proyecto dirígete a la barra de herramientas superior y da clic en el icono señalado.
{% endhint %}
6. Abre el **Software X-TRAINER Suite v1.0** en el apartado **PIC18F4550/45K50**, selecciona el archivo .hex generado al compilar el proyecto y programa la tarjeta.
{% hint style="success" %}
Si tienes dudas de cómo realizar los pasos anteriores puedes encontrar un manual del **Software X-TRAINER Suite v1.0**. a través del siguiente[ **link**](https://docs.microside.com/tarjetas-de-desarrollo/software-x-trainer-suite).
{% endhint %}
7. Al terminar de programar, la tarjeta **X-TRAINER** se reiniciará automáticamente y se ejecutará el programa de esta práctica.
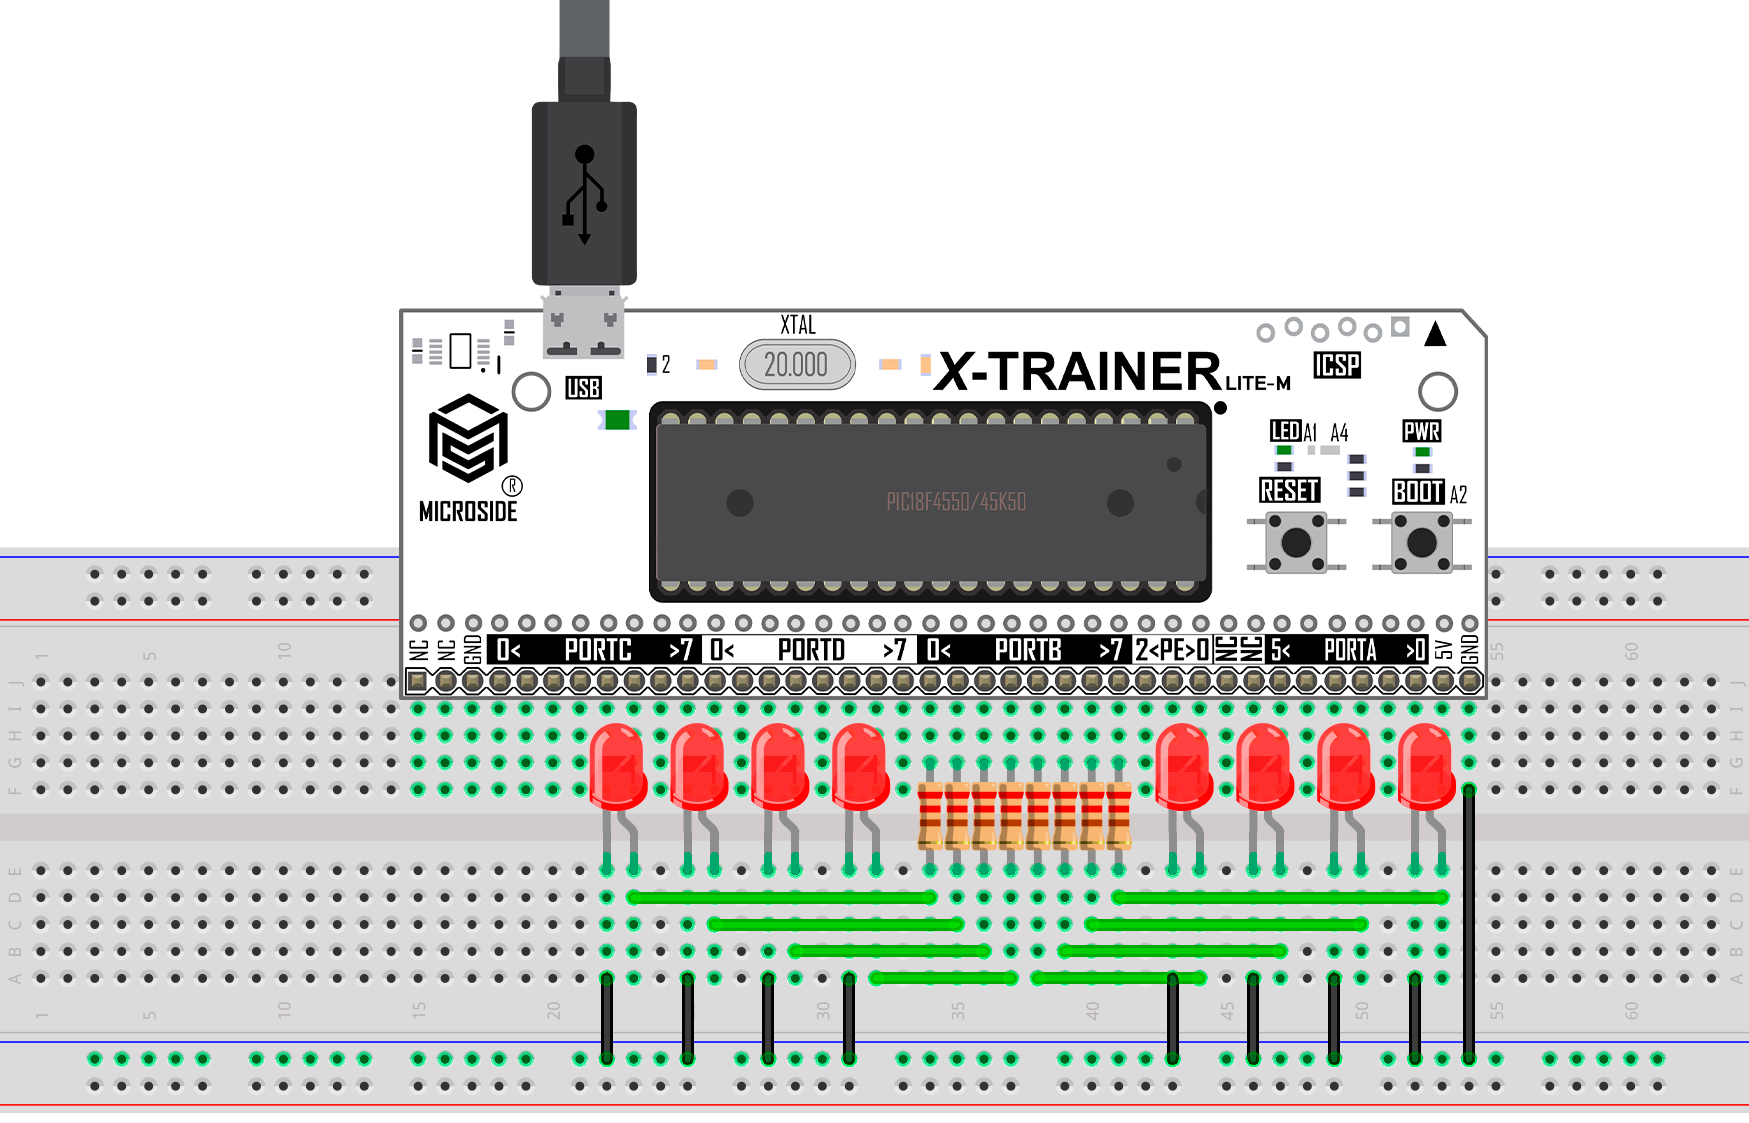
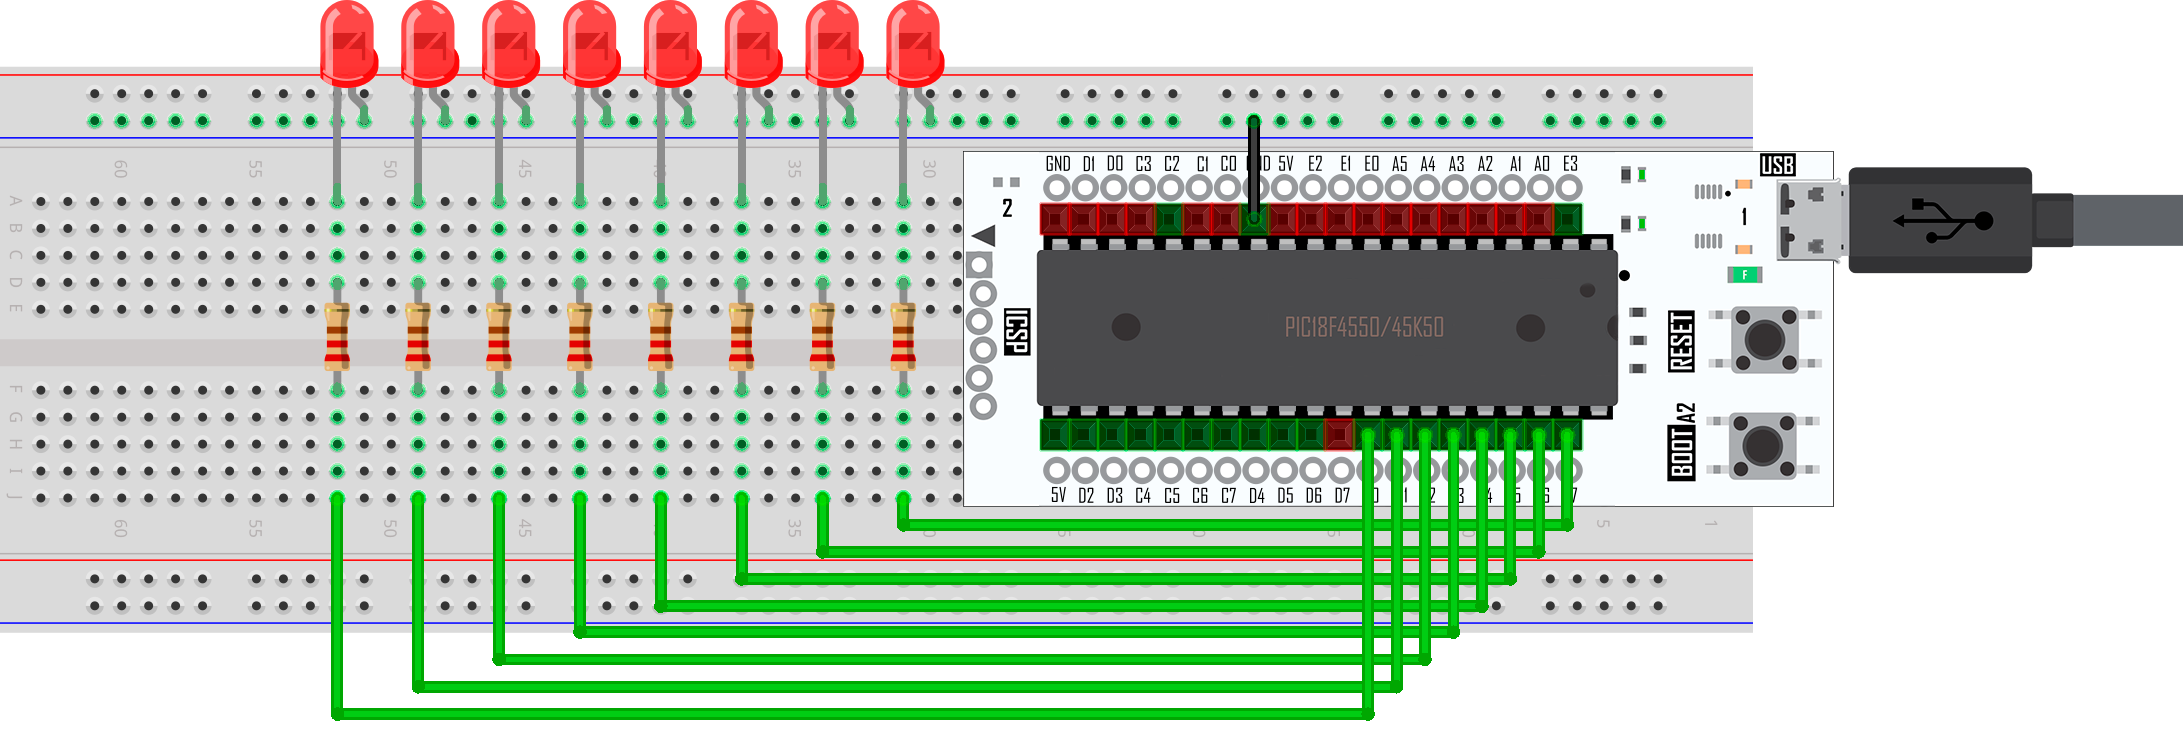
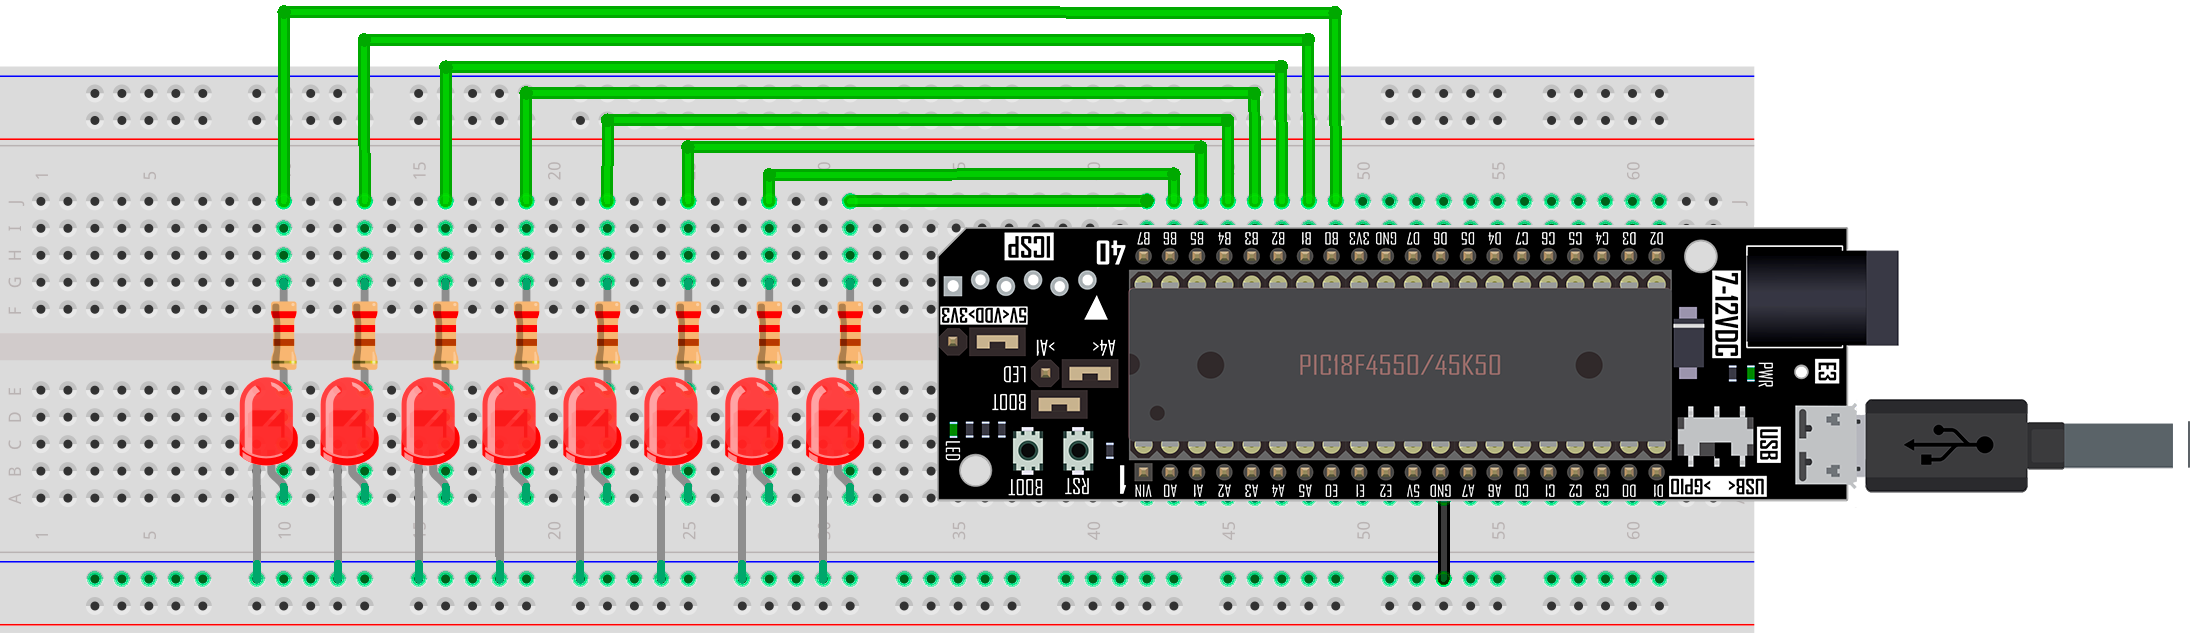
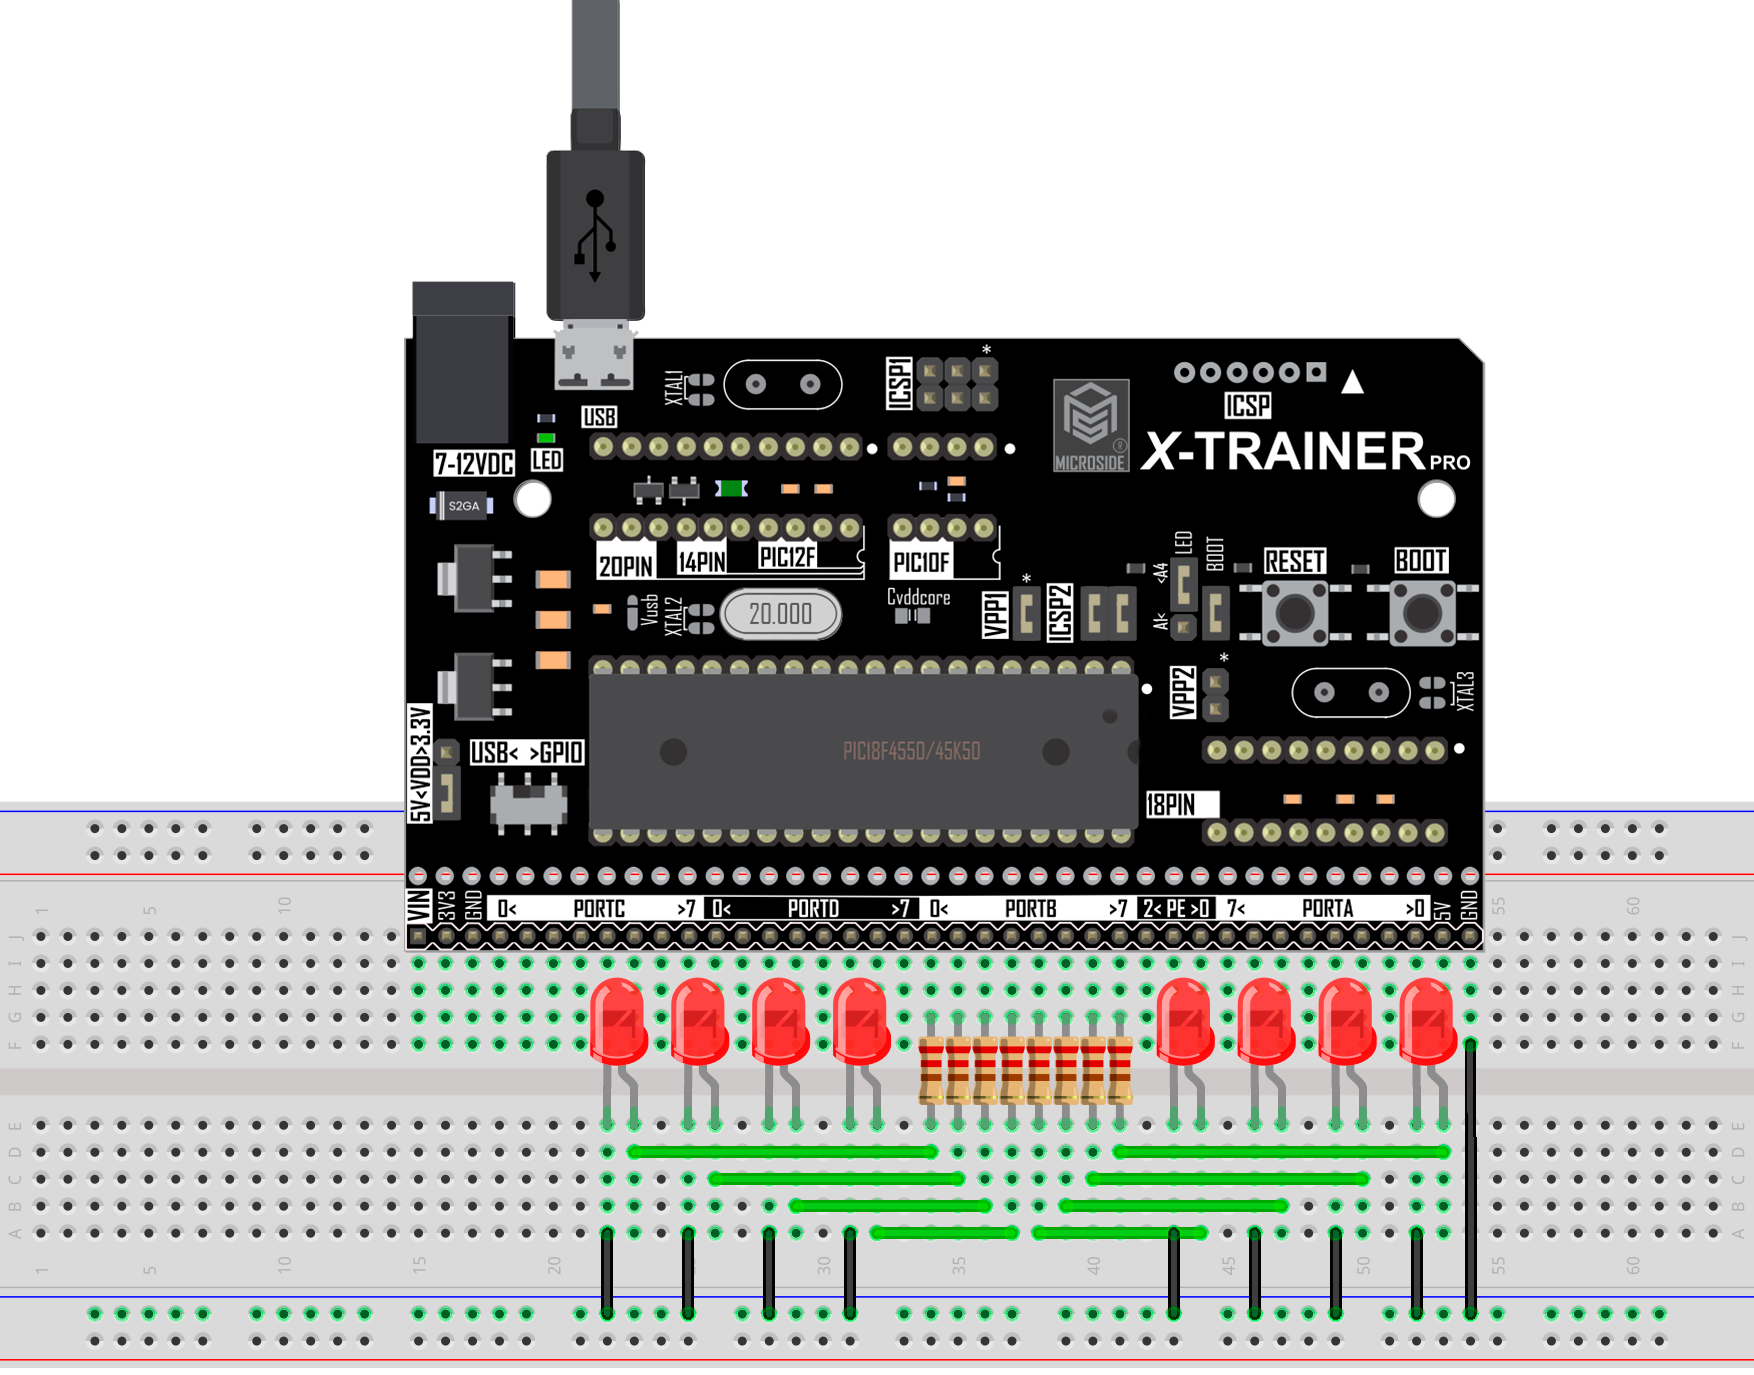
## **Diagrama esquemático**
Selecciona el modelo de tu tarjeta **X-TRAINER.**
{% tabs %}
{% tab title="LITE M R2" %}
{% endtab %}
{% tab title="LITE M R3" %}
{% endtab %}
{% tab title="LITE F" %}
{% endtab %}
{% tab title="DIP" %}
{% endtab %}
{% tab title="DIP R3" %}
{% endtab %}
{% tab title="PRO R2" %}
{% endtab %}
{% tab title="PRO R3" %}
{% endtab %}
{% tab title="PRO R4 " %}
{% endtab %}
{% endtabs %}
## **Código**
{% tabs %}
{% tab title="PIC18F4550" %}
{% embed url="" %}
{% endtab %}
{% tab title="PIC18F45K50" %}
{% embed url="" %}
{% endtab %}
{% endtabs %}
## **Descargas**